
From Drawings to Detections: How to Train a Simple Defect-Detection Model on Your Own Site Photos
Huzefa Motiwala November 19, 2025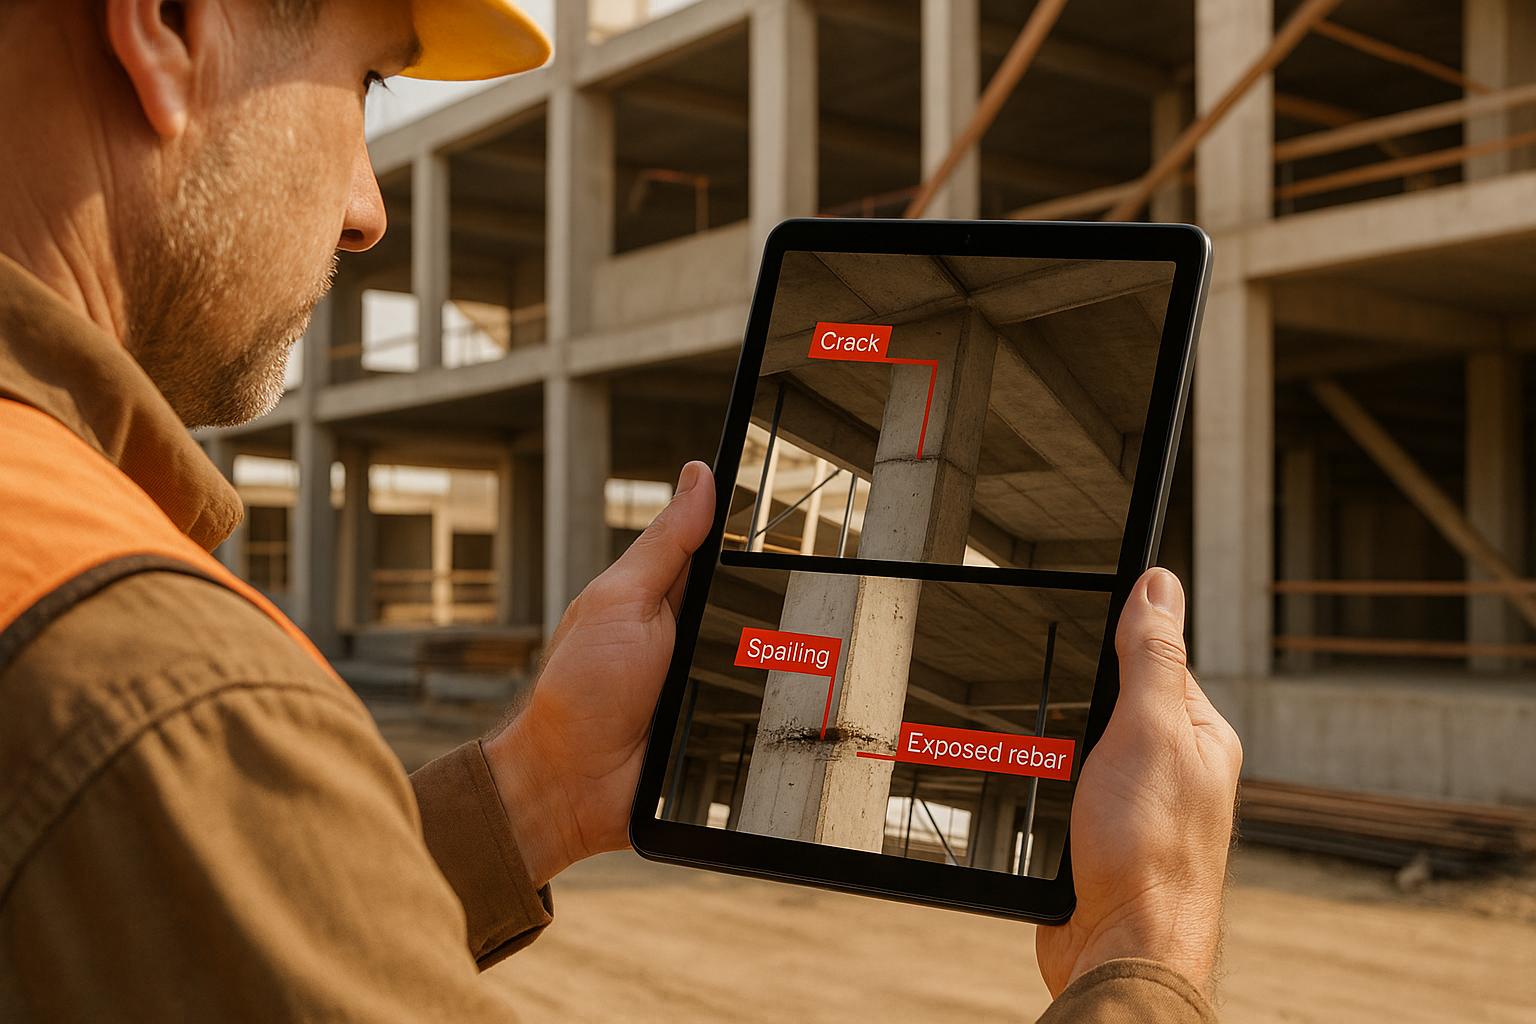
Want to detect defects in your products, construction sites, or materials using AI? Here’s how you can train a defect-detection model using your own photos, even without technical expertise.
- Why it matters: Using AI for defect detection saves time, improves consistency, and catches flaws human inspectors might miss. Training the model with your own site photos ensures accuracy by accounting for unique lighting, camera angles, and materials.
- Steps to get started:
- Collect photos from your environment, ensuring a mix of defect-free and defective examples.
- Organize your images into categories for training, validation, and testing.
- Annotate defects using tools like CVAT, Roboflow, or Labelbox to teach the AI what to look for.
- Train the model using pre-trained AI platforms, adjusting settings like learning rate and batch size to optimize performance.
- Validate the model by reviewing metrics like precision and recall, then deploy it for real-world use.
Tools like CVAT and cloud-based platforms make this process accessible, even for startups. You can start small, refine as you go, and scale up as needed. AI-powered defect detection is no longer limited to large corporations – it’s now achievable for businesses of any size. Ready to get started? Follow these steps to build your own solution.
Preparing and Organizing Your Photo Dataset
How to Collect Representative Site Photos
To build a reliable defect-detection model, start by gathering the right mix of photos from your site. You’ll need images that show both defective and normal conditions in equal proportions. This balance is essential for teaching the AI to differentiate between what’s acceptable and what needs attention.
Begin with a small dataset of around 20–30 images to test your process. Once you’ve confirmed your approach works, you can scale up to hundreds or even thousands of images. Starting small saves time and lets you quickly adjust if needed.
Make sure your photos reflect real-world conditions. Capture images from multiple angles and under different lighting scenarios. For example, if you’re inspecting manufactured parts, take photos in environments with bright overhead lights, natural daylight, and dimmer warehouse lighting. This variety ensures the AI can handle diverse situations.
Document each defect type clearly. If you’re detecting issues like scratches, cracks, or dents, include multiple examples of each. Take pictures from different angles and distances to help the model recognize defects no matter how they appear in future images.
Stick to fixed camera settings. Set your camera or smartphone to a consistent resolution – 1920×1080 pixels is a good standard for most cases. Avoid using digital zoom, as it can introduce distortions that confuse the AI. Instead, move closer to the subject for detailed shots.
Organizing Your Dataset for Training
Before labeling your images, set up a clear folder structure on your computer.
Divide your dataset into three main categories: Training (70%), Validation (20%), and Testing (10%). Within each category, create subfolders for each defect type, and use descriptive file names (e.g., "20251119_crack_concrete_beam_012.jpg"). The training folder is used to teach the model, validation images help tweak the model during training, and testing images evaluate its final performance on unseen data.
For instance, if you’re detecting surface defects, you might have subfolders like "scratches", "dents", "cracks", and "normal." This setup makes it easy to track how many examples you have for each defect type.
Separate raw photos from processed ones. Use a "Raw_Images" folder for unedited photos straight from your camera and a "Processed_Images" folder for resized, cropped, or enhanced versions. Keeping originals intact allows you to revisit them if you need to try different processing methods later.
Ensuring Data Consistency and Quality
Paying attention to quality now can save you hours of frustration later. Avoid blurry or poorly lit images, as they can teach the AI incorrect patterns.
Check image resolution and clarity before adding photos to your dataset. Defects like cracks or scratches should be clearly visible. If you can’t easily spot them, your AI model won’t either. Retake or discard any subpar images.
Ensure consistent lighting conditions across your dataset. Extreme brightness or darkness can confuse the model. If your site has areas with different lighting, include proportional examples from each zone. Avoid harsh shadows that obscure details or reflections that wash out important features.
Keep angles, distances, and backgrounds consistent throughout your dataset. If your operational photos are typically taken from 3 feet away at eye level, collect training images from similar positions. If unavoidable background elements are common in your environment, include them in your training images so the AI learns to ignore them.
Stick to common file formats like JPEG or PNG, and keep file sizes under 5MB to avoid slowing down the training process. While many platforms automatically resize images, starting with uniform dimensions makes everything smoother.
Defect Detection Model Trained on Synthetic Data w/ Omniverse Code, Adobe Substance 3D, and Roboflow
Image Annotation and Labeling Defects
Once your dataset is organized, the next step is to annotate the images, marking exactly where defects appear. This process is crucial because it teaches your AI model what to look for. Think of it like drawing boxes around issues – like circling a crack and labeling it "structural damage." These annotations transform raw images into training material for your AI.
The quality of these annotations can make or break your model’s performance. Rushed or inconsistent labeling results in a confused AI that either misses real defects or flags normal conditions as problems. Taking time to get this right now will save you major headaches later.
Choosing an Annotation Tool
When it comes to annotation tools, there are several solid options to consider, each with its own strengths:
- CVAT (Computer Vision Annotation Tool): This free, open-source tool is a favorite for its versatility. Developed by Intel, it supports bounding boxes, polygons, and segmentation masks. You can run it locally or use the cloud version at cvat.ai. Its simple interface allows you to upload images, create labels, and draw shapes around defects. Plus, it exports annotations in formats compatible with major AI platforms.
- Roboflow: If you’re looking for a polished experience, Roboflow might be the way to go. It includes preprocessing tools and even model training capabilities. Their free tier supports up to 1,000 images, which is perfect for smaller projects. Roboflow automatically resizes images, applies augmentations like rotation and brightness adjustments, and converts annotations into formats ready for TensorFlow, PyTorch, and other platforms. Its one-click export feature is a huge time-saver.
- Labelbox: For teams working collaboratively, Labelbox offers advanced project management and quality control features. While it’s more expensive, it’s ideal for larger projects with multiple annotators. The consensus feature is particularly useful, as it highlights disagreements among annotators for review.
For most small projects, CVAT strikes the best balance between features and cost. It handles complex tasks without a subscription fee, and the learning curve is manageable. Once you’ve chosen your tool, the next step is clear and consistent annotation to ensure your model performs accurately.
Annotation Best Practices
To maintain high-quality annotations, follow these best practices:
- Start with a review. Before each session, look at 5–10 images to refresh your understanding of what qualifies as each defect type. This helps keep your labeling consistent.
- Be precise. Draw tight bounding boxes around defects. For instance, if you’re marking a crack, the box should closely follow the crack’s edges rather than covering unnecessary surrounding areas. Loose boxes can confuse the AI.
- Label everything. Don’t skip small or partially visible defects. Omitting minor issues teaches the AI to ignore them in real-world scenarios. If a defect spans multiple categories (e.g., a crack with rust), either choose the primary concern or create separate labels for each issue.
- Use specific labels. Avoid generic terms like "damage" or "problem." Instead, use labels like "surface_crack", "paint_chip", or "weld_defect." Specificity helps the AI distinguish between different types of issues.
- Work in small batches. Annotate in short sessions and review your work frequently to maintain accuracy. Save your progress often, even if the tool has auto-save functionality.
Avoiding Common Annotation Errors
Annotation mistakes can undermine your model’s effectiveness. Here are some common pitfalls to watch out for:
- Over-labeling: This happens when normal variations, like shadows or reflections, are marked as defects. These false positives can lead to an AI model that flags normal conditions as problems. When in doubt, compare with "normal" images for reference.
- Under-labeling: Subtle defects, such as small cracks or early-stage corrosion, are easy to miss, especially in image corners. Zoom in and carefully inspect each section to catch these details. Missing them during training means your AI won’t detect them later.
- Inconsistent box sizes: If some annotators draw tight boxes while others include large margins, the AI gets confused about defect boundaries. Set a standard, like including 10–20 pixels of context around each defect, and stick to it.
- Mislabeling defects: Using inconsistent labels, such as calling a hairline crack "minor_crack" in one instance and "surface_damage" in another, creates conflicting training signals. Define clear criteria for each label and refer to them when unsure.
- Neglecting edge cases: Defects at image borders, tiny flaws, or unusual appearances often get mislabeled or skipped. These challenging examples are critical for training a robust model. When in doubt, include rather than omit.
To improve accuracy, have a peer review 10–20% of your annotations. This step helps catch errors, especially for critical defect types, without doubling your workload.
Training a Simple Defect-Detection Model
Once your images are annotated and neatly organized, you’re ready to train your AI model. The good news? Modern platforms make this process much simpler than you might think. You can often go from labeled images to a functional model in no time, even without advanced technical skills.
The secret lies in using pre-trained models. These models already understand basic visual patterns, so they act like a head start for your training process. This approach, known as transfer learning, not only speeds up the process but also reduces the amount of data you need to get good results.
Using Pre-Trained Models and No-Code Platforms
No-code platforms have changed the game for AI training. They handle all the complicated backend tasks, so you don’t have to. With these tools, you just upload your annotated images, tweak a few settings, and watch the training progress. Many platforms even include features like data splitting and augmentation to make your workflow smoother.
Most of these tools rely on advanced object detectors. After uploading your dataset and picking a model configuration that fits your needs, you simply hit "train." From there, the platform takes care of everything – managing resources, compiling the model, and tracking the progress. Once the model is up and running, you can dive into fine-tuning its settings to improve its performance.
Configuring Basic Model Settings
Fine-tuning your model’s settings is where you can really shape its performance. Here are three key parameters to focus on:
- Learning Rate: This controls how quickly the model adjusts its internal settings when learning from new data. A moderate default value is usually a good place to start, especially for transfer learning. If the model’s performance plateaus, you might want to adjust this.
- Batch Size: This determines how many images the model processes at once before updating its parameters. A moderate batch size strikes a good balance between efficient learning and the limits of your hardware. If your system struggles, try lowering this value.
- Epochs: One epoch is a full pass through your dataset. Too few epochs can result in underfitting, while too many can lead to overfitting. Monitoring a validation set and using techniques like early stopping can help you find the sweet spot.
Comparison: Local vs. Cloud Training
Next, you’ll need to decide where to train your model – locally or in the cloud. Each option comes with its own trade-offs:
| Factor | Local Training | Cloud Training |
|---|---|---|
| Cost | Requires hardware investment (e.g., GPUs) | No upfront costs; pay-as-you-go pricing |
| Speed | Depends on your hardware’s capabilities | Offers fast, reliable performance on demand |
| Setup | Time-consuming installation and configuration | Quick and easy to start |
| Security | Full control over data storage | Relies on provider’s security measures |
| Scalability | Limited by your hardware | Easily scales with project demands |
Local training is a good option if you want full control over your data, plan to run multiple projects, or want to avoid ongoing cloud fees. On the other hand, cloud training is perfect for teams looking to get started quickly, take advantage of powerful hardware, and scale up as needed.
For most startups creating their first defect-detection model, cloud-based training strikes the right balance of speed, convenience, and flexibility.
sbb-itb-51b9a02
Validating and Deploying Your Defect-Detection Model
With your model trained, the next steps involve carefully validating its performance and preparing it for real-world deployment. This stage ensures your model is both accurate and reliable before it becomes part of your operational workflow.
Evaluating Model Performance
Start by navigating to the Model > Analytics tabs to review your model’s performance metrics. Compare the model’s predictions against the ground truth data to identify where it excels and where it falls short. For example, the model might perform well in detecting straightforward defects like chips but struggle with more nuanced issues, such as frayed edges. This hands-on review helps you understand its strengths and pinpoint areas requiring improvement.
Key metrics like Precision, Recall, F1 Score, and Intersection over Union (IoU) are essential tools for assessing your model’s accuracy and how well it identifies defect boundaries. Additionally, analyzing the confusion matrix can reveal which defect types are misclassified or overlooked, providing a roadmap for further refinement.
Improving Results Through Iteration
Improving your defect-detection model is not a one-and-done process – it’s iterative. Here are some strategies to enhance performance when weaknesses emerge:
- Model-Assisted Labeling (MAL): Use predictions from your current model to pre-label new or challenging data. This approach speeds up the annotation process and helps refine your dataset for future training rounds.
- Dataset Expansion: Add more labeled examples, especially in areas where the model struggles. For instance, if it has difficulty identifying long scratches or performing under inconsistent lighting, collect and label additional images that reflect these conditions.
- Data Augmentation: Adjust data generation parameters to create a more diverse dataset. Combine synthetic data with real-world images to better represent the conditions your model will encounter in practice.
After updating your dataset, retrain the model and upload the results to your platform. Use comparison tools to evaluate changes in metrics like IoU, Precision, Recall, and F1 Score across iterations. This detailed feedback highlights which adjustments had the greatest impact. Once satisfied with the improvements, retest the model thoroughly to ensure it’s ready for deployment.
Deploying the Model for Practical Use
When your model meets performance benchmarks, it’s time to deploy it using real-world site photos. Use your platform to process new images and flag potential defects.
Pay close attention to detection confidence scores and boundary accuracy in the outputs. High confidence scores suggest the model is certain about its findings, while precise boundaries confirm accurate localization of defects. To maintain quality control, consider setting a confidence threshold to flag only the most reliable detections.
For deployment, a hybrid approach often works best. Process batches of site photos through the model, then have human inspectors review flagged areas. This method combines the efficiency of automated detection with the critical judgment of human oversight.
As your model operates in real-world conditions, document its performance by tracking how often its predictions align with field observations. Note any new defect types or unusual conditions it encounters. This documentation will guide future updates and help determine when retraining is necessary.
To streamline workflows, consider automating the process. For example, set up a system where new site photos are processed as soon as they’re uploaded. This allows your model to flag potential issues in real time, enabling your team to prioritize inspections and address problems proactively.
AlterSquare Support for Startups

Creating a defect-detection model from the ground up can be daunting, especially when juggling the demands of a startup. While this guide offers a starting point, having expert assistance can speed up AI development and help you avoid common mistakes. Here’s how AlterSquare steps in to tackle technical hurdles while keeping up with the fast pace of startups.
How AlterSquare’s MVP Programs Can Help
AlterSquare’s 90-day MVP program turns your defect-detection ideas into working products – quickly. By combining rapid prototyping with built-in AI tools, the program allows founders to test and refine their concepts without getting bogged down by technical roadblocks.
It all begins with discovery and strategy sessions. These sessions are designed to pinpoint your specific defect-detection requirements, photo workflows, and overall business objectives. This ensures the development process is tailored to your operations from the start.
Next comes the design and validation phase. Here, prototypes are tested in real-world scenarios, giving you a chance to make adjustments before moving into full-scale production. This hands-on approach ensures your solution is both practical and effective.
Conclusion
Transforming your site images into a working AI model is more achievable than you might think. You don’t need an advanced degree or a massive budget to build a defect-detection model tailored to your operations. By following the steps outlined in this guide, you can leverage accessible tools and techniques to create a solution that fits your specific needs.
This process takes raw photos and turns them into functional detection models through systematic steps like data collection, careful annotation, choosing the right platform, and thorough validation. The advantage? Your site-specific photos reflect the unique conditions, materials, and defect patterns of your operation – something generic models simply can’t replicate. This localized approach often leads to better accuracy, especially in specialized industries or environments.
Pre-trained models and no-code platforms simplify much of the technical work, allowing you to focus on what really matters: the quality of your data. And while your first model might not be perfect, that’s just part of the journey. Each iteration brings you closer to a reliable, production-ready system, turning manual visual inspections into automated insights.
For startups looking to fast-track this process, expert support can make a big difference. AlterSquare, for example, offers a 90-day MVP development program that combines rapid prototyping with AI expertise. Their guidance can help you avoid common pitfalls and build scalable defect-detection solutions more efficiently.
The tools are available, and the potential impact is huge. The real question is: when will you start collecting those first training photos?
FAQs
How can I keep my defect-detection model accurate as new defect types appear or conditions change?
To keep your model performing well over time, it’s crucial to update it regularly with new and relevant data. This might include examples of emerging defect types or images that showcase shifts in environmental conditions. By doing so, the model can better handle real-world changes and maintain its accuracy.
Begin by gathering updated site photos that highlight these changes. Clearly label any new defects or conditions in the images to ensure the dataset is well-organized. Once you’ve enriched your dataset, retrain the model and thoroughly test its accuracy to make sure it handles the new scenarios effectively. Consistent updates and validations are essential for ensuring your model remains dependable and performs as expected.
What’s the difference between using local and cloud-based platforms to train a defect-detection model, and how do I choose the right one?
The key differences between local and cloud-based platforms for training a defect-detection model come down to where processing happens, data privacy, latency, and scalability. Local platforms handle data directly on your device, which means quicker real-time results and tighter privacy control – especially useful in areas with unreliable internet. However, they come with a trade-off: your models need to be lightweight due to limited device resources. On the flip side, cloud platforms operate using centralized servers, which makes them better suited for scaling and easier to update. But they can introduce delays and may raise concerns about data security.
When deciding between the two, think about what matters most for your project:
- Real-time results: Local platforms work best for immediate processing.
- Data privacy: Local platforms give you more control over sensitive data.
- Internet reliability: Local platforms shine where connectivity is poor.
- Scalability: Cloud platforms excel at handling large datasets or managing multiple locations.
Your choice should align with your specific priorities and project requirements.
What can I do if my defect-detection model isn’t working well in real-world scenarios?
If your defect-detection model isn’t delivering the results you need, the first step is to take a closer look at your training data. Make sure it includes a wide variety of images that reflect real-world conditions. This means incorporating photos with different angles, lighting conditions, and backgrounds. Including more examples of defects or tricky edge cases can also make a noticeable difference in accuracy.
Another approach is to expand your dataset by blending synthetic images with actual photos. Synthetic data can help fill in gaps where your dataset might be lacking. However, it’s essential to validate the model’s performance using real, site-specific images to ensure it works reliably in practical scenarios.
Lastly, consider fine-tuning the model. This could involve tweaking its parameters or retraining it with a refreshed dataset. The key to improving performance lies in testing, gathering real-world feedback, and making iterative adjustments based on what you learn.
Related Blog Posts
- How AEC Startups Can Leverage AI for Better Project Estimation
- AI-Powered Quality Control: How Computer Vision is Revolutionizing Construction Inspections
- Computer Vision vs Human Inspectors: Construction Quality Control Showdown
- Computer Vision vs Manual Site Photos: What Actually Catches More Defects on Real Projects


Leave a Reply